
Creating a Jurassic Scene
- kevin.S
- May 8, 2019
- 7 min read
Updated: May 11, 2019
May 8, 2019
📷
Project title: Creating a Jurassic 3D animated scene with iClone and Hitfilm
Software used: iClone 6 Hitfilm Pro

Article Created By : Kevin Seid / 2D 3D Artist and Animator
School: Academy of Art University
Over the years, Kevin Seid’s talents have been applied in renown large and small AAA studios including
EA games, NASA TV and others. He also offers his services as a freelance artist when available. His many high-quality works can be found on his website, Facebook, YouTube and other social media channels.
I use both Iclone and Hitfilm they are both vital tools for any projects I create. They are streamlined and simple to use products. In a short time these products have enabled me to create over 160 animations and videos. Both Iclone and Hitfilm are great products and work well together to create almost any kind of art projects, whether it be some minor effects or large animation or film projects. These program can easily help you achieve all your final project goals with simplicity and efficiency.
This short tutorial will show you how I created a rich detailed animation with some custom effects. This tutorial was created with iclone and Hitfilm. In this quick tutorial I will cover a little on both programs and how I accomplish this detailed scene in a short time.
Tutorial assets –Total Plants 2 garden varieties by Reallusion, Terrains of the world by Reallusion. Botanical sampler by Reallusion. Tyrannosaurus Rex dinosaur by 4ToonStudio.
Scene Setup:
Let’s get started by setting up our scene in Iclone 6.
(These adjustment can always be edit at a later time)

I began by opening iClone 6 and setting up my scene by setting the size of the project and the length of the project. I chose 1920x1080p for the size and MP4 for my codec format. I finished the set up by choosing the amount of frames I wanted the project to be which was 2,000 frames.
Step 1: Water Placment
📷
After setting up my scene I then began by placing some water in the scene. I then chose the color of the water .I went with a darker green as this will be a jungle scene so the water should be a bit green as there will be lots of plants. In a jungle plants biodegrade over time giving the water a greenish brown tint. Once I chose the color I was ready for the next step.
Step 2: Placing a video plane.
📷
For this step I went to the content tab and chose the find file option, I chose a video I already had on my hard drive, then I proceeded by right clicking on the video and dragging it into the project area.
iClone then asked me how I would like to place the video. I chose the plane option. This placed my video plane in the project area.
📷
Tip:
To give the video plane a little extra realism I added a rock in the scene and lined it up with the rocks in the video. This adds extra depth and realism, also giving the illusion of a 3d rock coming out of the video plane. I then added a few plants to add even more depth to the video plane.
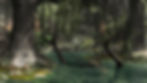
Step 3: Plants and rocks
📷
I began placing rocks and ground decals on each side of the video plane and slowly built the scene zooming out a bit more each time. Since I was only going to have a zoom in camera, I simply just zoomed out a bit at a time. Each time I got father away I added more rocks and decals on the ground. I repeated this until I had well detailed ground sections. All this was done in preview mode not camera view.
Once I had all the rocks and ground decals completed, I then added the smallest plants first like the mushrooms and insects. I fallowed the same steps by zooming all the way up to the video plane and then slowly zoomed out adding props as I zoomed out. Once I had all the smaller plants and insects in the places I wanted I was ready for placing my camera. I zoomed out to the point I wanted then added a camera making sure I was at frame 0. Then I slid the frame slider to the last frame 2000. Then I switched to camera view and zoomed in to the point I wanted. Then set the frame back to 0 and hit play. I now had a nice smooth camera movement forward. My camera was set to go so I switched back to preview mode as to not alter the camera motions.
Step 4: Plants trees and bushes
📷
Fallowing the previous steps I then proceeded to populate my scene with bushes tress and plants of various types. Whatever props you place can always be move adjusted and resized to your liking. Just remember you only need to populate the area that the camera actually views. Anything out of the camera view is useless to the scene. Once you have placed all the plants trees and bushes switch back to camera view and hit play. You will now have a camera moving through your jungle moving towards the water fall.
📷
Its good practice to take your time and play around with placement of the vegitation rocks tree's, be creative until you are happy with what you have.
Step 5: Creating a video waterfall in Hitfilm
📷
I created a new composite shot in Hitfilm and imported my green screened waterfall. I then went to the effects panel and chose the Keying effects folder. From that folder I selected the Color Difference Key effect. I dragged the effect to the composite shot and added it to my shot. This removed the green in my video leaving me with a waterfall with a transparent waterfall.
📷
I made a few quick adjustments then I added the sharpen effect to my shot and adjusted that effect to my liking. I then exported the video to my hard drive as a looped video with transparent background.
Step 6: Adding the waterfall to the scene
📷
Repeating step number two I brought in the waterfall video I created in Hitfilm. By creating the water fall video in Hitfilm, I now have a video of a waterfall I can use in any future projects.
📷
I then went though the scene adding waterfalls to areas I thought would look good. After picking a few areas I then added a few rocks and plants around the waterfall to give it a more natural blending with the scene. This will add a touch of realism.
Step 7. Adding characters and setting up the animation.
📷
After setting up my waterfalls in the scene I was then ready to add characters and animate them. The first step is to choose where to place the character / characters. After choosing where I wanted them I then set up a motion path for my raptor to fallow. One of the great advantages to iclone is the large selection of pre made market ready props. This allowed me to quickly animate the raptor with already premade animations. This is a major time saver over having to create everything from scratch which could take many hours or days of work.
📷
After setting up my raptor animation I then went through the scene and added other characters by just placing them where I wanted them. Once I had all my characters in place and set up I then animated them by adding pre made animations. Once completed I then switched to camera view and Hit play in the time line. Make sure you play the scene a few times make any adjustment you need to the scene. Once I had everything in place and everything looked as I wanted I was ready for the last step.
Step 8 lighting and rendering

Before the final render its important to make sure all the adjustments to lighting and shadows are done first. This step will vary for everyone as shadows and lighting is really just the personal preference of the artist. Setting up the light and shadows will set the mood to the final scene.
Once I had the lighting set to how I wanted the scene to look I was ready to render out my scene. For this I chose 3840x2160 4K’ at 3x3 super sampling. I then rendered the animation, once the animation was complete I was ready for the final step.
Step 9: Hitfilm Editing.
I brought the video into hitfilm to begin my edits and add effects.
📷
I created a composite shot then dragged my file to the timeline. I began by adding color filters to the scene. Playing with the color of the video is again the artist’s personal preference. I played around with the colors until I got what I liked. Then I added the sharpen filter and adjusted that to my preferences. The last filter I added to the video was brightness contrast. I then adjusted this to my preferences. ‘Play around with the 100s of effects filters use your imagination and have fun with your projects’.
📷
After I had the adjustment to my liking I then added a new grade to the composite shot. For this grade I added the light rays effect. This added light rays to a separate layer from the original video layer. I then dragged the light rays around the screen until I had it in the position I wanted. Then I adjusted the brightness and ray lengths and made all the adjustments I liked. Again this is up to the artist’s own preference.
📷
Once I had everything set up I watched it a few times and made any final adjustments to the filters. Once I had what I wanted and was happy with the scene I then exported the video. In a very short time I was able to create a nicely detailed scene.
Hitfilm users will benefit from iclone as the learning curve is small, within minutes you can create scenes or character animations and build a great content base for making animated movies and content. There will never be a shortage of clips to work with in Hitfilm. In a short time you can create your own clips. iClone gives Hitfilm users the ability to add animation to their video projects in a short time.
CGI and video go hand and hand in today’s industry, almost every movie today has animated scenes props or characters, why not create your own. iClone is the perfect program for any level user. Thanks to iClone’s fast character animation tools with the ability to animate and pose 3D characters quickly, Users can use large amounts of pre-made, high-quality content from certified content developers from around the world. Along with powerful industry plug-ins, Like Perception Neuron's body motion capture system, Kinect Mocap Plug in, multiple material channels for use with Substance, and iClone-custom content packs from SpeedTree, among many others.
Iclone is a wonderful animation tool that can save lots of time over other software packages as it is designed to really move forward with animation. You will not have to spend hours or days modeling every aspect of a project. The market base for iclone is very large and there is no shortage of props packs animations and more to keep you moving forward. If you want to really get into 3d animation and start animating in a short time iclone will help with that.

iClone is the fastest and most cost-effective 3D animation software in the industry, helping you easily produce professional animations in a very short time for films, previz, animation, video games, content development, education and art.
Includes 700+ Content Assets
Starting at $199.00